OKAY THESE ARE AMAZING AND ALL BUT WITH MY LUCK I WOULD JUST
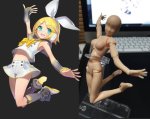
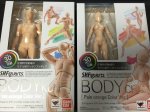
There is actually a free program everyone can download called DesignDoll which has unlimited posable models if you need more then just two or just simply don’t have the money to buy these figurines. The program is easy to work with and I’d recommend it to everybody!
yo here’s a useful tip from your fellow art ho cynellis… use google sketchup to create a model of the room/building/town you’re trying to draw… then take a screenshot & use it as a reference! It’s simple & fun!
Sketchup is incredibly helpful. I can’t recommend it enough.
There’s a 3D model warehouse where you can download all kinds of stuff so you don’t have to build everything from scratch.
reblog to save a life
This is an incomplete tutorial, and it drives me crazy every
time I see it come around.
We live in a pretty great digital age and we have access to
a ton of amazing tools that artists in past generations couldn’t even dream of,
but a lot of people look at a cool trick and only learn half of the process of
using it.
Here’s the missing part of this tutorial:
How do you populate your backgrounds?
Well, here’s the answer:
If the focus is the environment, you must show a person in relation to
that environment.
The examples above are great because they show how to use the
software itself, but each one just kind of “plops” the character in front of
their finished product with no regard of the person’s relation to their
environment.
How do you fix this?
Well, here’s the simplest solution:
This is a popular trick used by professional storyboard and
comic artists alike when they’re quickly planning compositions. It’s simple and
it requires you to do some planning before you sit down to crank out that
polished, final version of your work, but it will be the difference between a background
and an environment.
Even if your draftsmanship isn’t that great (like mine),
people can be more immersed in the story you tell if you just make it feel like
there is a world that exists completely separate from the one in which they
currently reside – not just making a backdrop the characters stand in front of.
Your creations live in a unique world, and it is as much a character as
any other member of the cast. Make it as believable as they are.
People often say to me: “You draw like some kind of inhuman machine. If I eat your brain, will I gain your power?” The answer is yes, but there is another way.
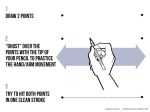
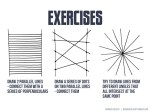
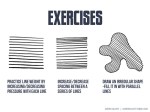
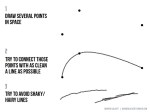
The key to precise drawing is building up muscle memory so that your arm/hand/fingers do the things you want them to do when you want them to do them. Teaching yourself to draw a straight line or to make sweet curves is just a matter of practice and there are some exercises you can do to help improve.
If you’re going to be doodling in class or during meetings anyway, why not put that time to good use?
There are a few programs I use on an almost daily basis as an artist and illustrator which I find invaluable, but that seem to be unfortunately more secret than they deserve to be. Which is too bad, because they solve a lot of small workflow problems that I think a number of people would find useful!
I’ll keep this list limited to my big three, but it is organized in order of usefulness. (And incidentally of compatibility, as the latter two are Windows-only. Sorry! Please do still check out PureRef though, Mac users.)
PureRef is a program specifically designed to make it easier to view, sort, and work with your references. I actually put off downloading it initially because it seemed redundant– couldn’t I just paste the refs into my PSD files? Indeed, the only real barrier to working with PureRef is that learning the keyboard shortcuts and the clicks to move around the program takes a little while. But getting over that hump is well worth it, because it has some distinct advantages over trying to organize your refs in your actual art program.
Firstly, you’re no longer bogging down your actual PSD file with extra layers, nor having to fight with said layers at all– PureRef has no layer panel, so you never have to scramble to grab the right one. All images you paste into the program retain their original resolution data, so you can resize, rotate, crop, etc as needed without distortion. If you find yourself needing to adjust the values, color, etc of a ref image, you can just copy paste it into Photoshop, make your adjustments, and copy paste it back into PureRef.
The other great advantage is that you can toggle the program as ‘Stay On Top’ and keep it above Photoshop (or whatever else)– which was always a problem when trying to make a reference collage in a separate PSD file. I find that I just don’t look at my references as much as I should when they are on a second monitor, and this solves that problem.
I’ve used it religiously for about a year now, creating a new PureRef file for every illustration I do, as well as a few for specific characters, cultures, or settings in personal projects. As you can see in the example above, I like to sort my images into little clusters or ‘islands’ of specific content, so that I can easily scroll out to see the entire reference map, then zoom in to the relevant cluster easily.
There is one big tip I would suggest for using this program, if you have the harddrive space: As soon as you get it, turn on the ‘Embed local images in save file’ option. This will make your PureRef files bigger, but you’ll never have to deal with a ‘broken link’ if you move around the source files you originally dragged in.
This is such a simple little app that it doesn’t have a very formal name, though I think of it as ‘Work’ or ‘Work Work’ (for some reason.) It’s a timer that counts when your cursor is active in any (of up to 3) program you set it to count for, and stops counting when you change programs or idle. No starting, pausing, stopping, or forgetting to do any of those three things.
I use this one to accurately track my hours, both to inform myself and for commissions or other client work. At the end of a work session, I take the hours counted and add them to the hours I’ve already spent on that image in a spreadsheet.
I have it set to count my three art programs (Photoshop, Painter, and Manga Studio), so based on the settings I use, it doesn’t count time that I spend doing relevant work in my browser (such as looking up an email to double check character descriptions or ref hunting), so to counter that, I set the ‘Timeout’ option in it’s menu to 360. This means it will count to 360 seconds of cursor inactivity before it considers me idle and stops counting. Since it instantly stops counting if you switch to ‘non-work’ a program, I figure this extra time just about cancels out relevant time that it ignores in ‘non-work’ programs by counting an extra minute or so when I walk away from the computer to grab some water or what-have-you.
I use Carapace the least of these three, since my work doesn’t often have a need for creating perspective lines. But when there is architecture involved in something, this proves invaluable in simplifying that process.
Carapace lets you copy paste an image into it, and then drop in vanishing points and move them around to create perspective lines. (Though you’ll want to scale down your full res drawing or painting a bit to avoid lagging the program.) Like with PureRef, fighting the shortcuts is the worst part of it, though for myself it’s more of an issue in this program because I don’t use it often enough to remember them. Still, it gets the job done, and it’s easy to adjust the points to feel things out until you get them ‘right’. Then you just copy and paste the grid back into your art program and you’ve got that information to use as need be on its own layer.
Of course, using Carapace isn’t a replacement for actually knowing how perspective works– you still have to have a sense of how far apart the vanishing points should be placed to keep things feeling believable. But it sure does save you a lot of trouble once you do have that knowledge.
So, there are my big three recommendations for programs to help your art workflow. I hope people find them useful– if you do, please share so that they climb a little higher out of their unwarranted obscurity! And if you’ve got a favorite tool like this that I didn’t cover, feel free to share it in the comments. I know I’m curious to see what else is out there, too. Also, if Mac users have any suggestions for programs that fill similar functions, feel free to share there as well!
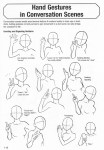
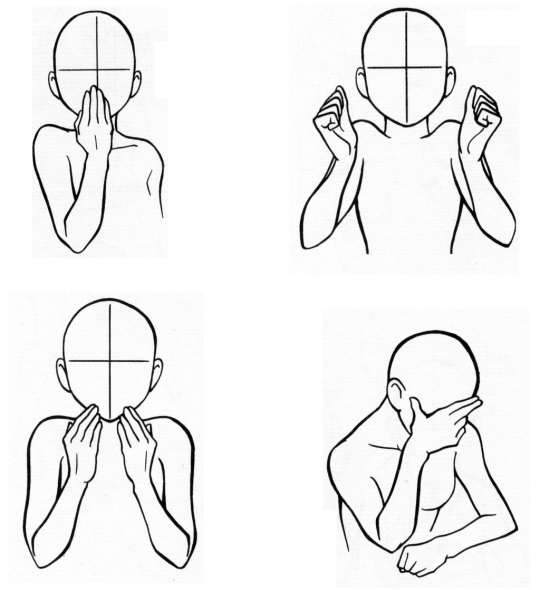
I don’t consider myself qualified to teach art at this point in my life, but I don’t see any harm in sharing observations I have made. In learning to draw hands over the past few months I’ve tried to take a lot of notes, with the end goal of hopefully creating a video tutorial one day. I personally learn better from videos than written or illustrated instructions, but I’ve never found any one video that really demystifies drawing hands.
I believe that in order to tackle such a difficult subject it is important to understand what makes it difficult, and this is not often addressed. If you understand the problems you can systematically solve them…
Drawing the hand is almost like drawing a whole person. Similar number of “major masses” and a big range of motion.
Because the hand is so versatile, it’s hard to pick a pose when practicing. Most individual body parts are drawn from different angles, whereas the hand must be drawn from different angles and in different poses.
Hands have a lot of moving parts and from any given angle many of these will be partially or wholly obscured by other parts. Drawing “through the form” results in confusing construction lines that are difficult to interpret.
Hands are expressive and give big clues as to what a character is doing. Odd or unnatural hand poses detract heavily from your overall piece. Most people avoid drawing hands because of this.
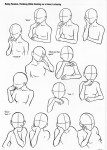
The thumb flexes along a different plane than the four fingers and sits on its own deviant metacarpal. Drawing the hand in perspective is hard enough, but adding the thumb in relation to the rest of the hand at a convincing angle? Forget about it!
Hands are typically simplified into box and cylinder forms, but almost every part of the hand is a combination of angles and curves. No one simplified form really describes these parts.
Hands interact with other objects, like all the time. They’re tricky enough to draw on their own… this isn’t helping anyone.
Hands have a lot of bony landmarks, veins, and tendons, all visible at the surface level. These are obstacles when trying to render them realistically.
Hands are asymmetrical from every angle. Every part, every time.
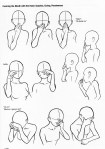
I think that about covers the major issues we face when trying to draw hands. Now here are some observations and facts that you can use to fight back!
The width of the first three fingers (index, middle and ring) is the same as the width of the wrist. The pinky and thumb both emanate from the parts of the palm that overhang this line.
The palm of the hand is more of a pentagon than a rectangle (Thanks, Jim Lee!).
The length of the middle finger is approximately the same as the length and width of the palm.
The length of the phalanxes (finger bones in this case) diminishes in size as they get further from the palm. The second (middle) phalanx is 2/3 the length of the first (proximal), and the third (distal) is 2/3 the length of the second. You don’t really notice this since the first knuckle is “inside” the palm and we tend to think of the fingers as starting at the “finger crotch”.
The thumb has no middle phalanx, only a proximal and a distal one.
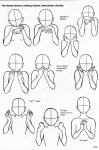
The thumb is rotated 90 degrees from the angle of the four fingers. So the fingernails point “up” and the thumbnail points “to the side”. This obviously changes depending on the pose, but the thumbnail never really points “up” with the other fingernails unless it is bent backwards, as in poses when all five fingers are pressed against a flat surface. It never really points “down” unless the hand is clamping or pinching… or operating a sock puppet.
The thumb has to sit lower than the palm so that it can flex underneath the hand. The first knuckle of the thumb is almost as far below the index finger as the pinky is far away from the index finger.
The “webbing” of the thumb connects exactly half way up the palm.
Hands are asymmetrical from every angle. Every part, every time.
That is all the knowledge I have so far, and now you have it too! I don’t think any tutorial, video or otherwise, can ever teach you as much as the thousand observations you will make from drawing a thousand hands. There is no substitute for practice. So practice by looking at your hand from the normal vantage point, and from a mirror. Practice from 3D reference like the Handy Art Tool. Practice by copying other artists and animators whose hands appeal to you. Most of all, practice from imagination.
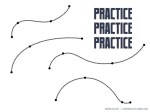
PRACTICE!
Below is every reference that I can remember that I’ve personally used while practicing hands: